Deploy a React and Vite site to production
Build your React/Vite frontend locally, inspect the files that will become public, and publish the output with the Shipvela CLI. This walkthrough includes a runnable example, an actual local build check, and a way to distinguish a failed build, missing asset and broken client-side route.
Updated
Choose the right deployment path before building
This walkthrough uses a static upload. The browser receives HTML, CSS and JavaScript; it does not start your development server. You can use your own app or the small downloadable example below. First check whether the app needs a server process as well as a frontend.
| Project you have | Path to use | What to check |
|---|---|---|
| React/Vite browser app with a dist folder | Build locally, then shipvela publish dist --spa for a new upload project. | Private API operations must already live in a separate backend. |
| Supported npm React/Vite repository at its root | Use the manual GitHub guide. | Commit/push first, then explicitly deploy. A push alone does not publish. |
| Astro static output or a Next.js static export | Publish the already-built static folder; Next.js exports normally use out. | Use --spa only for a client-side single-page app, not merely because a tool generated the site. |
| An app that starts a general Node server or non-Next SSR runtime | Keep a suitable server host or deliberately produce a genuinely static export. | A folder named dist is not proof that an application is static. |
| Compatible Next.js 12–15 SSR | Separate GitHub deployment path on a paid plan. | This static-upload guide does not enable SSR, databases or a backend server. |
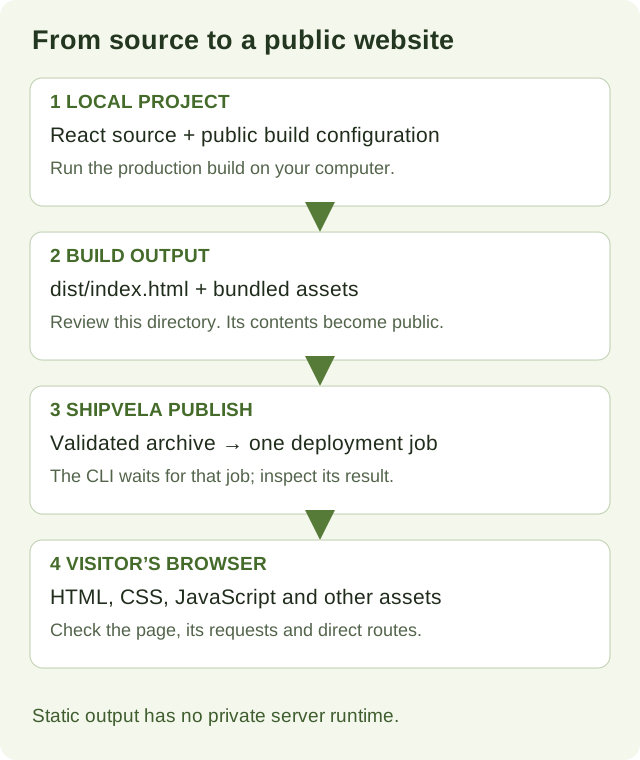
Prepare the project, runtime and destination
- Use Node.js 22.12+ on a supported release line and npm. CLI 0.3.0 requires Node 22+; this example was compiled with Node 22.20.0, Vite 8.3.1 and React/React DOM 19.3.0. Check your own app’s engine requirements before switching runtimes.
- Have a Shipvela account and install its CLI from the versioned setup instructions. Do not substitute an unverified npm package with a similar name.
- Identify the app’s build script and output directory. Review any existing
shipvela.json: it determines which project a subsequent publish updates. - Configure only public frontend values before building. A private API key must not be placed in a
VITE_value. Read the environment variable guide if the app needs configuration.
Check the tools in the terminal you will use
node --version
npm --version
shipvela --version
The first two commands report installed runtime versions; the copied CLI checked for this guide reports 0.3.0. A successful version check does not log you in or prove that hosting is configured. Current Vite requirements are documented in Vite’s getting-started guide.
| Setting | Value | Reason |
|---|---|---|
| Build script | vite build through npm run build | Produces the browser assets instead of starting the development server. |
| Output directory | dist | Contains the HTML entry point and bundled assets. Substitute your configured build.outDir if different. |
| Public base path | / for a site at its own hostname | A GitHub Pages repository subpath from an old setup may be wrong on a standalone hostname. |
| SPA routing | Enabled when creating the upload project with --spa | Allows a browser URL such as /guide/deep-link to reach the client entry point. |
Start with a reproducible example or your existing app
Download the React/Vite example, extract it and open shipvela-react-vite-fixture in your terminal. It includes source, a lockfile, a README and a build inspector. It contains no credentials, remote API calls or automatic deployment script. The example displays the current path; it is a small routing check, not a full router library.
Commands run for the isolated example
cd shipvela-react-vite-fixture
npm ci --ignore-scripts
For an existing app, work in its root instead. Use its documented installation process and a committed npm lockfile. The example deliberately needs no install lifecycle scripts; do not blindly add --ignore-scripts to an app whose native dependencies require them. If package.json and its lockfile disagree, fix that mismatch locally instead of deploying a different dependency tree. See npm ci.
For the example, create .env.production.local with these harmless demonstration values. Its .gitignore excludes local env files. These values are not private credentials.
Example-only build inputs
VITE_SITE_LABEL=Shipvela production fixture
VITE_SHOW_BANNER=false
PRIVATE_SENTINEL=PRIVATE_SENTINEL_MUST_NOT_BE_BUNDLED_72
The label intentionally appears in the public bundle. The unprefixed sentinel tests the default Vite exposure rule; it is not a substitute for reviewing all generated assets for sensitive content.
Build and inspect the production files
Executed against the downloadable example
npm run build
node scripts/inspect-build.mjs
The local build completed and generated dist/index.html plus a hashed JavaScript asset. The example’s inspector returned the following values. Hashed filenames and timings can change; this check is about the artifact and its contents.
Observed local output — no cloud deployment
{
  "indexHtml": true,
  "javascriptFiles": 1,
  "publicLabelPresent": true,
  "unprefixedSentinelPresent": false,
  "falseFlagEnablesBanner": false,
  "productionModePresent": true
}
The inspector belongs to the downloadable example, not the Shipvela CLI. For your own app, inspect its output or adapt the script. Every browser-delivered file should be treated as public, even if the originating environment variable was hidden in a dashboard.
| Item | Publish? | How to handle it |
|---|---|---|
dist/index.html and generated JS/CSS/assets | Yes | Publish the output directory as a complete build. Do not upload only index.html. |
| Source project root with package.json | No | Shipvela rejects that root; select dist or your actual build output. |
| node_modules, local env files, credentials, local databases and source maps | No | Known types are excluded by the CLI, but review your output rather than relying on filename filtering alone. |
| A secret embedded in a JS or HTML string | Never | Removing an env file does not remove an already-bundled secret. Rotate an exposed credential and rebuild. |
| Symlinks inside the output | No | Replace with intended real public files; the CLI rejects symlinks. |
The upload limit is 50 MB and 5,000 files. Large media may need an appropriate separately managed asset service or a deliberate reduction in output; do not upload the source tree to get around an output problem.
Check a local production preview
Preview the built files locally
npm run preview -- --host 127.0.0.1Open the URL printed by Vite, then visit /guide/deep-link directly. In the example the heading should show the configured label and the path line should reflect that URL. This browser inspection is a step for you to perform; the recorded fixture evidence covers local compilation and HTTP responses, not a live hosted browser session.
Check the Network panel for failed JavaScript, CSS and image requests. A page that works under npm run dev can still fail when its production asset URLs or configuration differ. Stop preview with Ctrl+C after inspection. Vite preview is a local inspection tool, not the server you keep running in production.
Publish the reviewed output with the existing CLI
Live procedure — run only for the project you intend to publish
shipvela login
shipvela publish dist --name my-react-site --spa --json
Login opens Shipvela’s approval page. Compare the terminal code and approve only the request you initiated. The first publish creates an upload project and writes shipvela.json; the CLI sends the archive to Shipvela’s authenticated validation endpoint and waits for the particular hosting job it starts.
If a project link already exists, the publish updates that project. --name and --spa are creation choices; adding them to a later publish does not create a separate site or repair an existing routing configuration. Check the linked project’s build settings if it was created with the wrong routing mode.
With --json, progress is on stderr and the final result or error object is on stdout. A successful result contains projectId, job and url; verify that the job status is SUCCEED. A login response, packaging message or upload acknowledgement is not the final deployment receipt. No hosted receipt is fabricated in this article.
Read-only follow-up; replace JOB_ID with the actual numeric job ID
shipvela status --json
shipvela logs --job JOB_ID --json
The CLI waits by default for publish. If it times out, the job may still be running. Inspect status before repeating the mutation. The CLI does not automatically retry a publish mutation merely because a response was lost.
Verify the hosted page, assets and direct routes
- Open the actual returned HTTPS URL and confirm a visible detail from the intended build. Do not copy a URL from an earlier unrelated project.
- Load a direct client route in a new tab and refresh it. This checks the hosting fallback as well as the app’s route handling.
- Inspect the JavaScript/CSS requests that the HTML references. They should load with the expected content, not a 404 page or HTML fallback disguised as a script.
- Exercise a meaningful interaction. If the app calls an external API, check its production URL, authorization and CORS behavior separately; successful hosting does not configure that API.
- Retain the job ID and build version in your release notes. Add a custom domain only after the default hosted URL works.
For an update, make the intended source change, run the build again, inspect the output, then run shipvela publish dist --json from the same linked project root. An old dist folder republishes old code even when your source files changed.
Diagnose the failing layer before publishing again
| Symptom | Check first | Recovery |
|---|---|---|
| “The directory needs an index.html” | Did the build succeed, and is this its actual output directory? | Build first; publish the directory containing the generated entry point. |
| Build exits with dependency or TypeScript errors | The first actionable build error and the local Node/lockfile versions. | Fix the source or dependency mismatch and rerun the build. Uploading cannot repair a failed compilation. |
| Blank page with asset 404s | The exact script/image URL in Network and the generated HTML. | Correct the app’s base path or asset reference, rebuild and publish the entire output. |
| A script request returns HTML | Response content type/body and whether a missing script path was rewritten. | Fix the missing asset or path; do not treat a 200 status alone as proof that JavaScript loaded. |
| Root works but a direct client URL fails | Hosting SPA mode and whether the app implements that route. | For a new SPA upload use --spa; for an existing project inspect routing settings. Verify again after deployment. |
| API requests fail but the UI renders | Production API URL, browser error, API response and allowed origin. | Correct the external service configuration or public build value; rebuild if that value was compiled into the frontend. |
| Old open tabs fail to load a dynamic import after an update | Whether the tab requests an old hashed chunk absent from the current deployment. | Test a fresh page load; investigate HTML/service-worker caching and the app’s update behavior. Do not promise a hosting rollback that is not available. |
| CLI wait times out or connection drops | The exact started job in status/logs. | Wait or diagnose that job before retrying; a lost response does not imply cancellation. |
For base-path and stale-chunk behavior, consult Vite’s production build guide. For imported versus public assets, use Vite’s asset guide. Avoid repeatedly reloading on every error: a broken path will remain broken and a reload can discard unsaved user input.
What was checked, and what still needs your acceptance test
The downloadable example was compiled locally with the versions listed above. Its generated bundle passed the shown inspection. Separate isolated tests exercised the real CLI archive packager, exclusion and rejection rules, and CLI control flow against clearly synthetic responses. These checks do not certify your app or prove that a production deployment, custom domain, OAuth flow or Claude Code session succeeded.
This workflow serves a static frontend. It does not provision databases, run arbitrary backend processes, or guarantee compatibility with every AI-generated project. When your own successful job, HTTPS URL, direct routes and key interaction pass, you have completed the deployment acceptance check for that build.